
5.2 Intel核显SR-IOV
从 12 代 Intel 处理器开始,CPU 附带的集显已经支持 SR-IOV 方式的显卡拆分,不同于 N 卡的付费版 vGPU,这款最新的显卡拆分技术是完全免费的。
有一位牛人从 intel 维护的 Linux 版本中,抽出了 SR-IOV 相关的驱动制作成了 DKMS 模块,目前支持 Linux 6.1 ~ Linux 6.5。
官方链接:https://github.com/strongtz/i915-sriov-dkms
参考文档:https://www.michaelstinkerings.org/gpu-virtualization-with-intel-12th-gen-igpu-uhd-730
我的测试环境为:PVE 7系统,使用PVE 的 6.2 内核,处理器是 i5-13400,搭配核显 UHD 730
在宿主机上安装 PVE 的6.2版本的 kernel 与 header,以及 dkms、sysfsutils、git、build-essential 等软件
apt install pve-kernel-6.2 pve-headers-6.2 dkms build-essential git sysfsutils
更新initramfs、grub并重启
update-initramfs -u && update-grub && pve-efiboot-tool refresh && reboot
# 下载驱动
➜  ~ git clone https://github.com/strongtz/i915-sriov-dkms.git
# 修改dkms.conf,修改PACKAGE_NAME与PACKAGE_VERSION
➜  ~ head i915-sriov-dkms/dkms.conf
PACKAGE_NAME="i915-sriov-dkms"
PACKAGE_VERSION="6.2"
...
# 拷贝驱动到/usr/src
➜  ~ cp -r i915-sriov-dkms /usr/src/i915-sriov-dkms-6.2
# 安装驱动
➜  ~ cd /usr/src/i915-sriov-dkms-6.2
➜  i915-sriov-dkms-6.2 git:(master) ✗ dkms install -m i915-sriov-dkms -v 6.2
# 检查状态
➜  i915-sriov-dkms-6.2 git:(master) ✗ dkms status
i915-sriov-dkms, 6.2, 6.2.11-2-pve, x86_64: installed
编辑 /etc/default/grub,修改 GRUB_CMDLINE_LINUX_DEFAULT,添加 i915.enable_guc=3 i915.max_vfs=7
➜  ~ grep GRUB_CMDLINE_LINUX_DEFAULT /etc/default/grub
GRUB_CMDLINE_LINUX_DEFAULT="quiet intel_iommu=on iommu=pt video=vesafb:off,efifb:off,simplefb:off i915.enable_guc=3 i915.max_vfs=7"
编辑 /etc/sysfs.conf,配置 VF 数量,这里只开启了 3 个
echo "devices/pci0000:00/0000:00:02.0/sriov_numvfs = 3" > /etc/sysfs.conf
检查显卡驱动,6.2 内核已经携带 tgl_guc_70.1.1.bin
➜  ~ ls -lh /lib/firmware/i915/tgl_guc*
-rw-r--r-- 1 root root 315K Apr 17 20:47 /lib/firmware/i915/tgl_guc_49.0.1.bin
-rw-r--r-- 1 root root 319K Apr 17 20:47 /lib/firmware/i915/tgl_guc_62.0.0.bin
-rw-r--r-- 1 root root 336K Apr 17 20:47 /lib/firmware/i915/tgl_guc_69.0.3.bin
-rw-r--r-- 1 root root 271K Apr 17 20:47 /lib/firmware/i915/tgl_guc_70.1.1.bin
-rw-r--r-- 1 root root 280K Apr 17 20:47 /lib/firmware/i915/tgl_guc_70.bin
更新initramfs、grub并重启
update-initramfs -u && update-grub && pve-efiboot-tool refresh && reboot
重启后可以看到 SR-IOV 拆分出的三个显卡
  ~ lspci -knn|grep VGA|grep Intel
00:02.0 VGA compatible controller [0300]: Intel Corporation Device [8086:a782] (rev 04)
00:02.1 VGA compatible controller [0300]: Intel Corporation Device [8086:a782] (rev 04)
00:02.2 VGA compatible controller [0300]: Intel Corporation Device [8086:a782] (rev 04)
00:02.3 VGA compatible controller [0300]: Intel Corporation Device [8086:a782] (rev 04)
创建虚拟机,添加PCI设备时可以看到三个拆分出的显卡
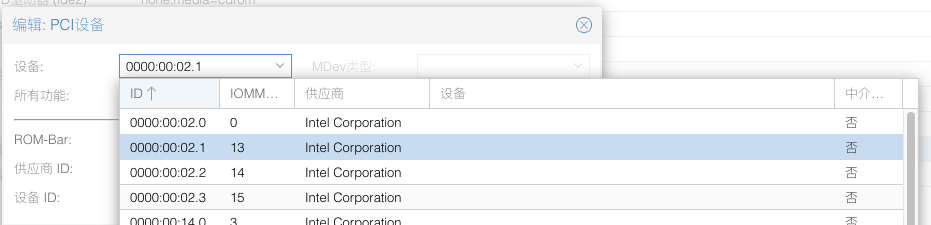
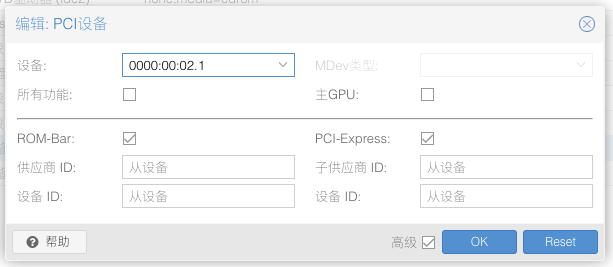
添加设备时注意只能选择派生出的三个vGPU,不可使用00:02.0主显卡,选择vGPU后不可勾选所有功能
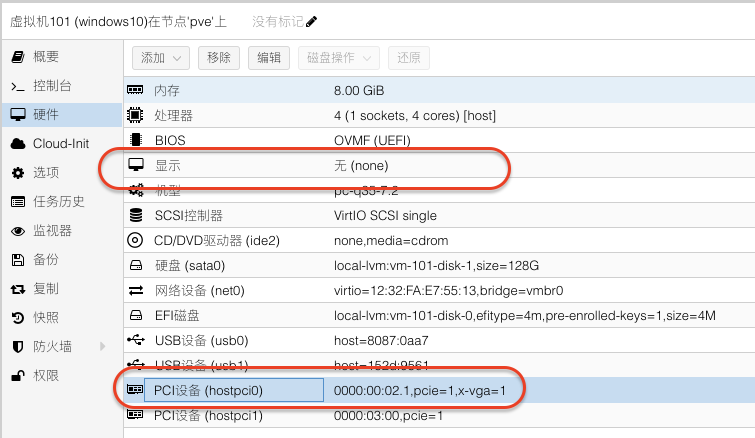
启动Windows后安装驱动,并开启远程访问,然后关机,回到硬件页面,关闭显示,并配置vGPU为主GPU
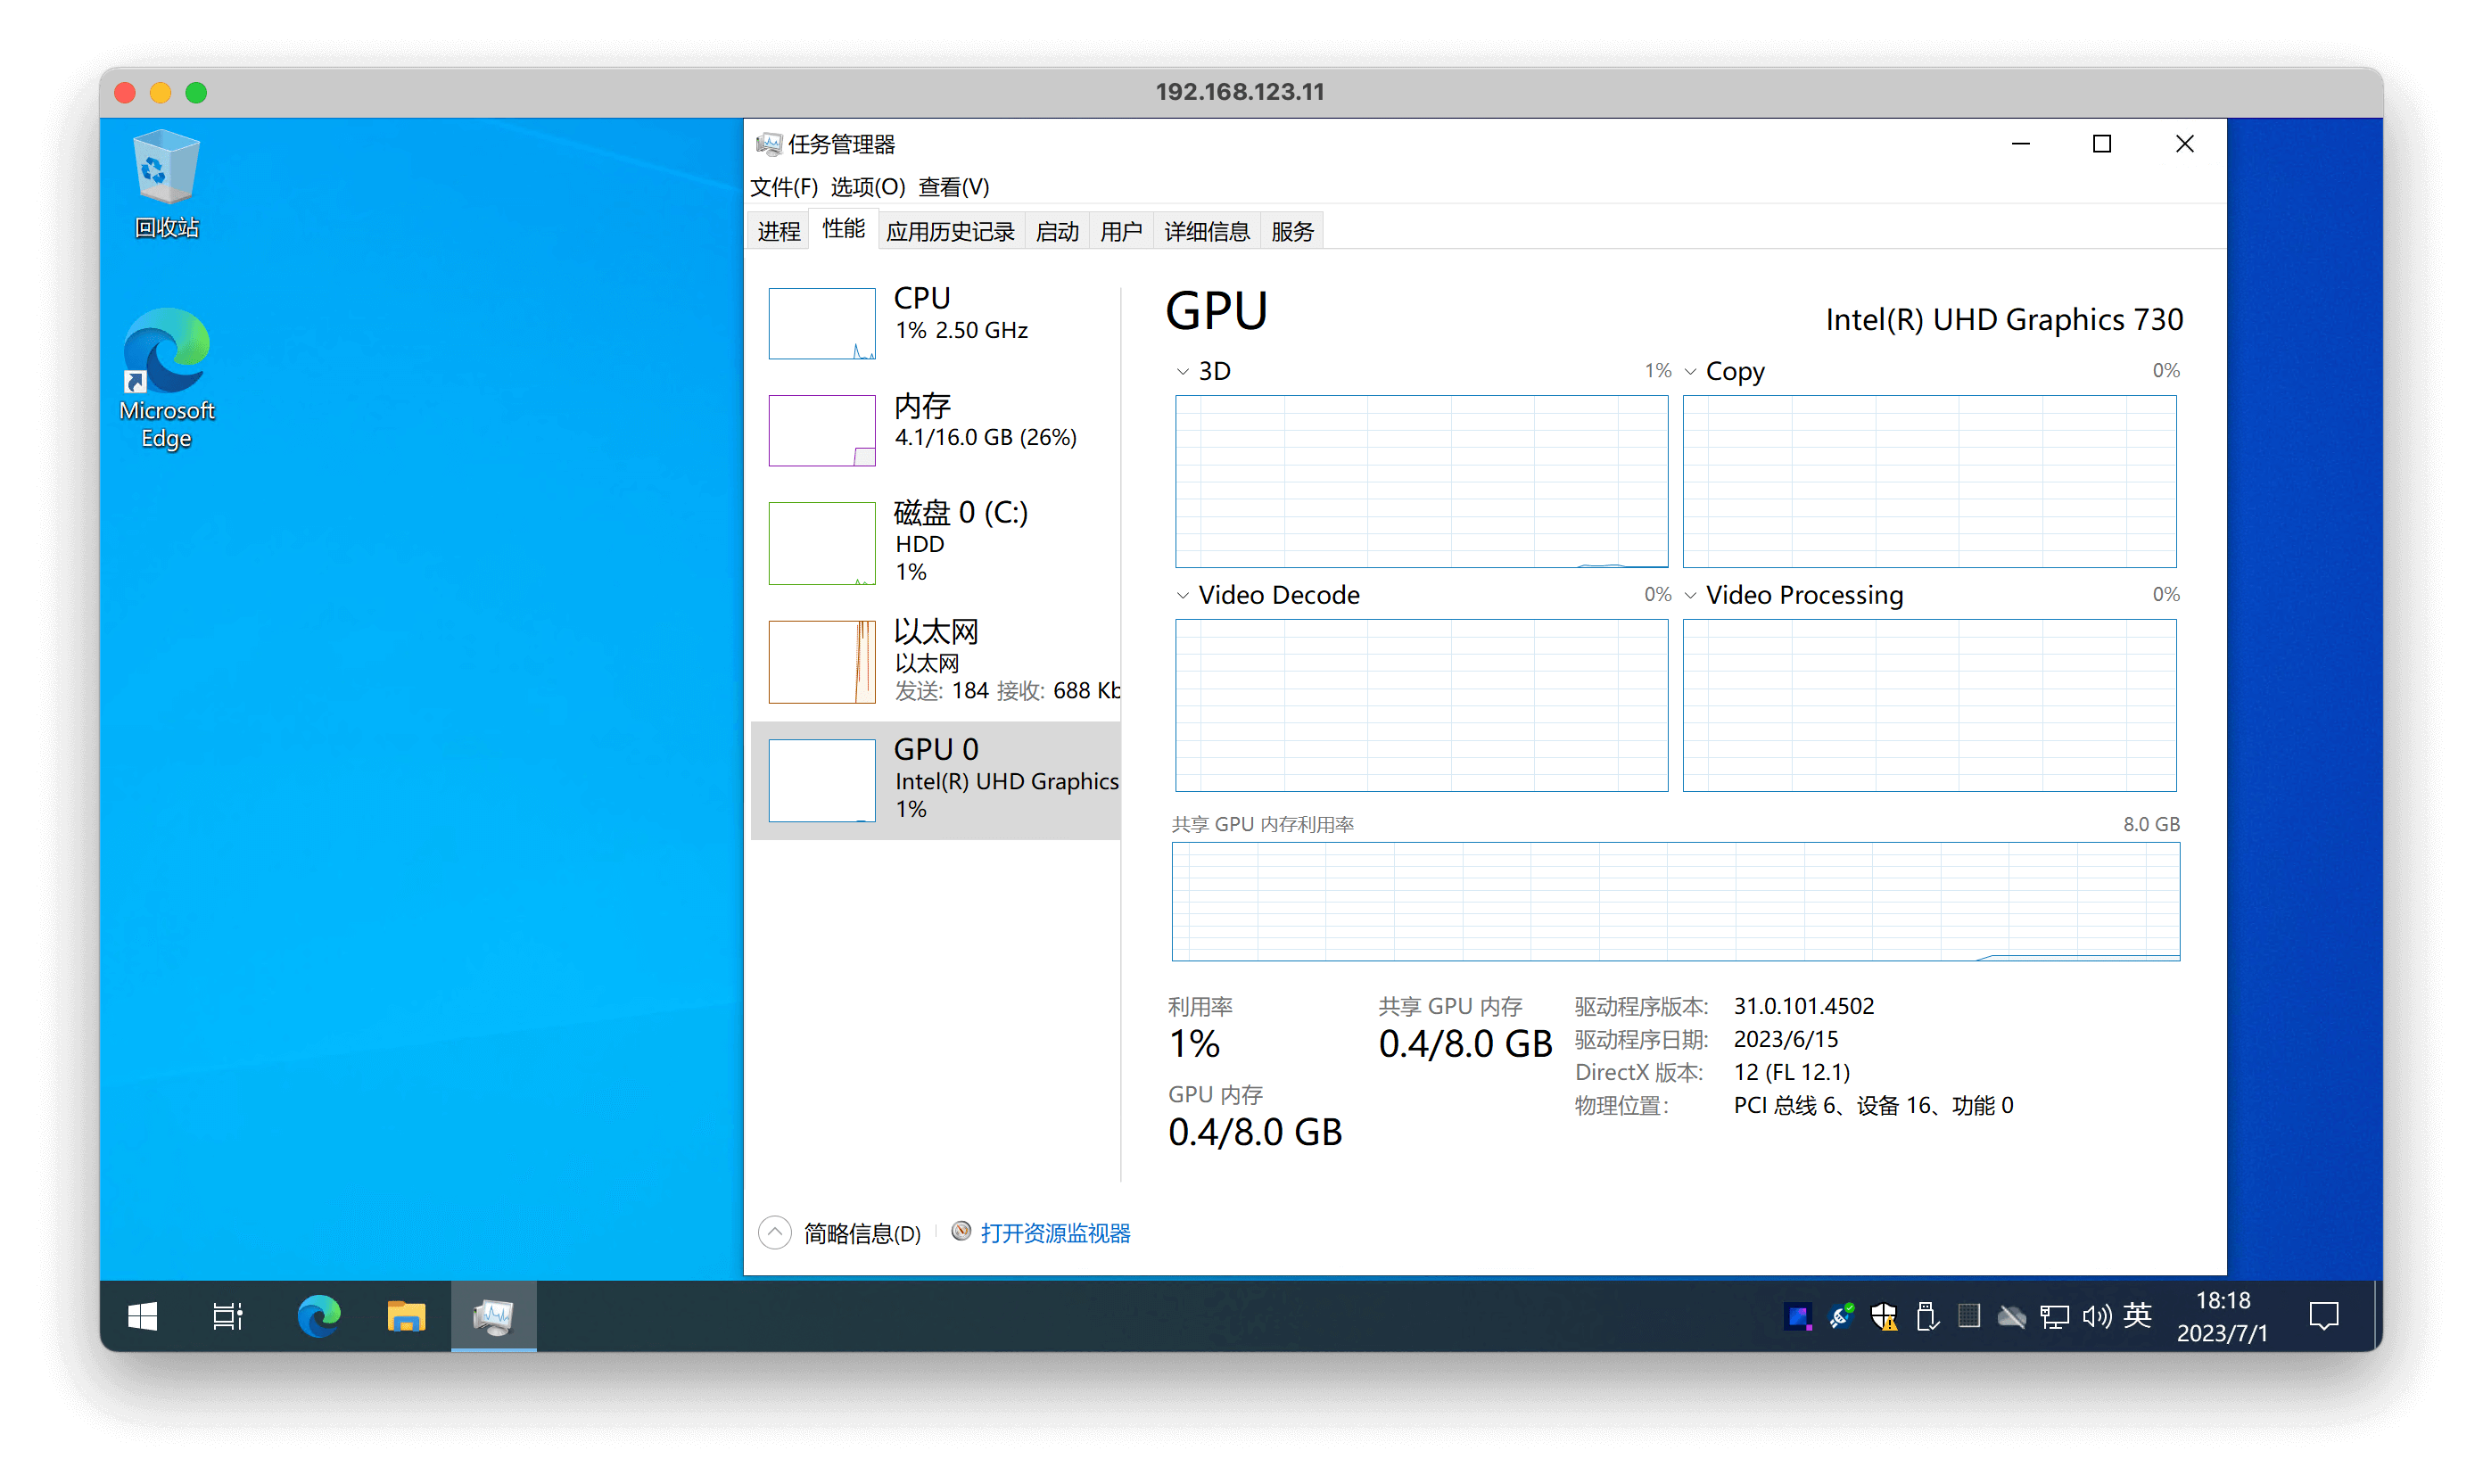
启动Windows后使用RDP连接,即可看到显卡被正常驱动了
而对于 LXC 容器,直接将显卡挂载到容器内即可,通过 ls -lh 命令检查设备信息,然后将 1~3 显卡设备挂载到容器内即可
➜  ~ ls -lh /dev/dri
total 0
drwxr-xr-x 2 root root         80 Apr 17 12:23 by-path
crw-rw---- 1 root video  226,   0 Apr 17 12:23 card0
crw-rw---- 1 root video  226,   1 Apr 17 12:23 card1
crw-rw---- 1 root video  226,   2 Apr 17 12:23 card2
crw-rw---- 1 root video  226,   4 Apr 17 12:23 card3
crw-rw---- 1 root render 226, 128 Apr 17 12:23 renderD128
crw-rw---- 1 root render 226, 128 Apr 17 12:23 renderD129
crw-rw---- 1 root render 226, 129 Apr 17 12:23 renderD130
crw-rw---- 1 root render 226, 131 Apr 17 12:23 renderD131
➜  ~ cat /etc/pve/lxc/122.conf
...
lxc.cgroup2.devices.allow: c 226:1 rwm
lxc.mount.entry: /dev/dri/card0 dev/dri/card0 none bind,optional,create=file
lxc.cgroup2.devices.allow: c 226:129 rwm
lxc.mount.entry: /dev/dri/renderD129 dev/dri/renderD129 none bind,optional,create=file
卸载流程是安装流程的逆向操作,如下:
- 移除所有使用到 SR-IOV 显卡的虚机和容器配置
- 移除 grub 与 sysfs 的配置,然后执行 update-grub 与 update-initramfs -u
- 移除 dkms 驱动:dkms remove i915-sriov-dkms/6.2 –all
最后重启宿主机。